Clothes

Clothes, Tutorials

DIY: Studded Shoes

FeaturedImage.jpg

A while ago I saw some Jeffery Campbell skulltini flats, which are basically simple flats completely encrusted with skull studs. I thought they were super cute and I wanted them, but of course I ended up talking myself into making some of my own. So today I'll be showing you how to make some, too!

You'll need: a pair of shoes a marker scissors some studs - I'm doing skull shaped ones, but you can do whatever you like! a rivet setter with small anvil (I got these in a set of rapid rivets I bought a long time ago.) Optional: a bigger anvil

Use a marker to mark where you want the studs.

Use your scissors to carefully poke a hole at each mark

Stick the stud through the hole...

... and stick the backing on.

Position the anvil, concave side up, inside the shoe, right under the stud and position the rivet setter, concave side facing down, on top.

Give the rivet setter  few good whacks with your hammer.

Here you can see the concave sides on the anvil and rivet setter.

If you happen to have a bigger anvil, like this, you can use it in conjunction with the small anvil and rivet setter to help you set the studs. It's not completely necessary, but if you have one it's nice to  use.

Repeat until you've covered the whole shoe.

Yay, done!

I absolutely love how these turned out!

Here are some affiliate links for some of the stuff in this project:

The flats

Skull studs

Anvil and rivet setter

Clothes, Tutorials

DIY Simple High Heel Shoe Repair

171.jpg

Look at this face. hobbes02

Meet Hobbes, the destroyer of shoes. Actually, I should give him a little credit because he has only ruined one pair of shoes, however they happened to be one of my most favorite pairs.Thankfully he didn't do too much damage to them, so instead of throwing them away I decided to try to fix them.

In this tutorial I'm basically just explaining what I did for this specific pair of shoes so hopefully this tutorial can be helpful if anyone else has similar damage to some shoes.

suppliesSupplies.02First, I had to finish what Hobbes started. I removed the rest of the material from the chewed up heel, and then removed the corresponding material on the other shoe.03I rolled the heel on the scrap leather to eyeball how much I'd need to cover it and cut the excess off.04In small sections I glued the scrap leather on the heel and kept it taut as I worked my way up.05 06 07When I got up to the top of the heel and underside of the shoe I cut a notch into the leather so I could stretch it to wrap around the heel.08I applied the glue and then laid down one side of the leather.09Then, using the grove in the middle of the heel, cut the excess off with an xacto knife. 10And then I repeated for the other side.11He popped off the heel tip while he was enjoying my shoe as a chew toy, but thankfully there was almost no damage to it, so I just folded over the extra leather, applied glue and stuck the heel tip back on. Then I applied a good bit of pressure for a few minutes while the glue cured.12On the other side, since I wanted them to look the same, I had to pop off the heel tip and then I repeated the last few steps to glue it back on with the scrap leather sandwiched in between.13He made sure to damage just enough of the back of the shoe to where I felt like it needed to be covered as well, so I did that and added a little design element where the leather folded down towards the outside of the shoe. 14Then I cut the excess off, forming a little cap on the back.15I did it a bit messy though and the edge looked really rough, so I ended up cutting a thin strip of leather to cover that ragged edge.16And I repeated on all the edges, to make everything cohesive.17And here they are, complete!

I'm pretty happy with how they turned out. What do you all think?

Clothes, Tutorials

DIY Embroidered Appliqué

A few months ago I came across a sweater that I totally fell for. It was the embroidered crane sweater from the Altuzarra for Target collection. I just loved the design and the placement of it, but of course, being the crafter that I am, I ended up talking myself into embroidering some of my own designs and throwing them onto a sweater to create something that has the same feeling like the original sweater. So today's project is going to be the embroidered appliqué that I made to attach to a thrifted sweater.

Keep reading for a video summary!

suppliesHere's what you'll need. You'll want to cut the water soluble fabric and tulle to fit your embroidery hoop.

01Draw your design onto some water soluble fabric.

02Take the middle hoop and drape the black tulle and water soluble fabric over it and then push the outer hoop over it all and tighten the hoop slightly. You'll want to keep it loose enough to be able to pull the fabric in the hoop, but tight enough to keep it in place once you've pulled it.

Work around the hoop gently pulling the fabric taut. Then finish tightening the hoops all the way.

03Embroidery time! I was totally inspired by Michele Carragher's embroidery style. I'm not really going to go into detail about how to do this part because I was just kind of winging it and doing what felt right for that part of the design. According to my research I was using a combination of stem stitches, detached chain stitches and split stitches. And of course I added some beads and jump rings as embellishments.

04

05Here it is all finished! Well, the embroidery part anyway.

06

To secure the thread ends and to make sure nothing moves too much, paint a thin layer of Mod Podge onto the back of the design. It's important to use Mod Podge because once its dry it isn't water soluble so you wouldn't have to worry about washing the glue away whenever you did laundry.07Tear off as much of the water soluble fabric as you can.

08Trim the excess tulle away leaving 1/8 inch on the edges.

09

You can see here where the water soluble fabric didn't tear away, so off to the sink I was.10Under running water, gently rub the areas where the water soluble fabric is still clinging on for dear life. It will dissolve away.

11I made two mirrored embroidered appliqué designs and sewed them on the shoulders of a thrifted sweater.

And...

12Finished!

I hope you enjoyed this project! I actually like it a lot more than the original sweater I based this project on. This is my first major embroidery project so if anyone has any better techniques or anything like that for me then please leave a comment! :D

Stay tuned for some holiday goodness next week!

Clothes, Tutorials

3 Easy Beanie Mods

I love beanies. Like shoes and scarves, I feel like you can never have too many. Since it's finally starting to get cold where I live, I thought I'd put together a few ways to spruce up some simple, plain beanies.

A summary of the video will follow!

Beanie 1

For the first beanie I embellished it with two pom poms to give it a sort of teddy bear ear-esque look. Hover over the images or click on them to see instructions!


Beanie 2

This second beanie mod is inspired by Korean fashion. One of my guilty pleasures is Kpop music, and I feel like I was always seeing the idols wearing cute beanies with really long bunny ear like bumps on top. I decided I needed to own something similar. And here it is! Hover over the images or click on them to see instructions!


Beanie 3

This last beanie mod isn't reminiscent of any kind of animals like the last two were. This one is simply if you wanted to add a little edge to the thing. Hover over the images or click on them to see instructions!

And those are the beanie modifications I wanted to share with you all! I hope you all liked them. I'm super excited to add these guys to my beanie rotation now!

Clothes

Laurel Earwarmers

I've been watching the Olympics for the past few days, and even though it's summer time, it inspired me to make these ear warmers. The warmers are inspired by the laurel wreaths that the winning Olympians would be crowned with. I had just learned the crocodile stitch and it ended up being the perfect stitch for this project because of how much it looks like leaves.

Here it is. A front view, side view and back view.

And here's how it looks being worn:

Front, side and back. I actually really like how it turned out and can't wait for it to get cold so I can wear it around!


Clothes, Misc-

Knitting Up a Storm

IMGP0444.jpg

Christmas is just around the corner, so what does that mean?  It's time to bust ass on your crafting projects so you can be done in time to give them out to all of your appreciative family and friends.  I hadn't knit anything in a while until recently when a friend asked me to teach them how to knit.  I've been working on knitting projects every day since.  I just thought I could write up a quick post and show you guys what I've been working on lately! This is a close up shot of the scarf I knit first.  I used a pattern I found off Ravelry.com but unfortunately even after digging around for it, I can't find the exact one I used.  If I come across it later I'll definitely post it. I actually messed up reading the knitting chart, but it still ended up working out.

I absolutely love how this one turned out.  It was my first attempt at blocking, and I think it worked out quite well.  I didn't really measure anything out, I just stretched and pinned, so some areas are kind of wavy but overall it looks good.  I used the Tiger Eyes Lace Scarf pattern I found on Ravelry.  Personally I think it looks more like owls than tigers.

This is my current project.  I found the pattern on, you guessed it, Ravelry, but I actually couldn't find the Ravelry link in my history- I could only find the direct link to the pattern.  So here it is!  It's actually grown about two feet since I took this picture.  It's quite a fast and easy knit.  I like how it's turning out so far.

Here's a close up of the knit.  It reminds me of rice. :)

I like to consider myself as an intermediate level knitter, I've knit some scarves, gloves, socks, hats... but there's one thing that will always scare me.  Sweaters.  It is my goal to knit a sweater soon.  Here is the one I'm going to attempt to knit: Hundred of sheep, but I decided that I won't start a sweater until after Christmas so I can use my time to knit more gifts for people.  Here's hoping I won't chicken out!

Clothes

Halloween Costumes

windup.jpg

So Thanksgiving is a few days away, so what am I posting? My finished Halloween costumes of course!  Sorry it took forever to get these photos, my sister took them and she has been quite busy with school so it took her a while to send them my way.  Well, better late then never!

So as most of you know, I decided on Poison Ivy this year.  I dyed my stockings, I made my gloves, I made my boots, I made the leafy eyebrow pieces and I made some fake lashes to top it off (which I did wear for the party I went to, but I forgot to bring them to take pictures of the costume a few days later unfortunately). 

Full body shot

Close up of my face.

I ended up being invited to another Halloween party last minute, but I didn't want to reuse the same costume (mostly for comfort reasons - those boots killed my feet) so I pulled out my old wind up key that I made for Halloween a few years ago and two petticoats I made - one for Halloween and one for a friends bachelorette party and a little flower ring I made - and threw a costume together.  I made the black circle skirt on a whim a few days before I was invited to the party and thought it would fit the costume perfectly.  I decided the color scheme would be black and pink because the belt, one of the petticoats and the ring were hot pink (my friend had a Barbie bachelorette party).  I poked a hole through the back of the belt and stuck the wind up key through it.  They day of I actually curled my hair and my sister loaned me a pair of pink and white socks.  I also had a different pair of black flats.  I went with contacts as well because the fake eyelashes were too big to be contained by glasses.

Here is a kind of crummy picture of the costume the day of the party so you can see my hair (kind of), the socks and the wind up key.

My sister needed a costume to wear at her extra curricular activities and whatnot and after finding some awesome fabric at the store she decided she wanted me to make her a simple cloak so she could be a wizard.  I also ended up making her a want too as seen in this post.

Here is what the fabric looks like with the wand.

I found a lot of patterns for "circle skirt" type cloaks but I wanted to do something fairly simple because I didn't have that much time and I only had two yards of fabric.  I ended up finding this website that explained how to make a cloak very simply and with a maximum of 2 yards of fabric, yay!

And action shots:

I made the hood come to a point.

 The fabric flowed nicely and looked awesome when she walked around.

She just wore her street clothes underneath.

I actually really loved how the cloak turned out.  I'm half considering being something next Halloween that involves a cloak of some kind so I can make myself one!

Clothes, Misc-, Tutorials

Freaky Friday!

So I've been pretty busy with crafting especially with Halloween right around the corner, and thankfully I've actually managed to take some pictures for you guys to see!  I was meaning to make this post earlier but time caught up with me so here we are.  Sorry about that!  To make up for that, this is pretty much going to be three posts in one!  I have two parts of my costume I need to show off as well as a semi tutorial on how to make a wand for my sister's costume. So here we go!

I'm going to be Poison Ivy from Batman this year.  So first things first, for my costume I decided I wanted to wear some sort of heel.  I wanted to see if I could score some green pumps from Goodwill, but I ended up going home with these:

I decided I could just cover them with some leaves and be done with it, so I ended up with these:

Which look... okay.  I tried them on with my dyed tights, but I didn't really like how they looked with everything.  I was just going to suck it up and deal with it, until one day I decided that I NEEDED some knee high super villain looking boots.  I looked up some tutorials for converting high heels into boots, and found a simple boot cover tutorial by Sarcasm-hime.  Easy enough!  I got green vinyl from the fabric store (it was half off! Score!) and got to boot-coverin'.  I've seen where people just sew the bottom up and leave a hole for the heel, so you can just slip the cover off and on, but I opted for a more permanent solution.  I used hot glue to secure that sucker down.  Here they are:

They ended up kind of wrinkly since the vinyl fabric wasn't cooperating very well, but I think they'll work out just fine for my costume.  This actually worked out a lot better than I thought it would, and I'm probably going to attempt to make more boots sometime.

So next!  I wanted some long gloves to make this costume complete.  I had no idea on how to make gloves, so I started trying to search for some patterns online.  I found some really complicated ones, and I even found how to draft a custom glove pattern that I tried out (with muslin!) but I got some of the measurements wrong and I decided that those types of gloves would be too much work for a little Halloween costume that I'd wear once or twice.  I didn't want to make gloves that were as easy as just tracing around your hand and sewing along that line, but I didn't want to waste time doing the super complicated gloves, so lucky for me I found something that was in between those two.  I ended up finding a video that taught you how to draft a pretty easy pattern for gloves.  Click here to see!


So here's my drafted pattern.  I messed up on marking the thumb.  The bigger curve is the correct one.  If you want to know how to do this, please watch the video I linked to above.  He's much better at explaining it than I would be!

My master patterns!He recommends using tissue paper to draw your pattern on, so I grabbed the closest tissue paper I had around me.  Primary color polka-dotted tissue paper, ftw!   I pinned the tissue paper onto my stretchy knit fabric and started sewing. When done sewing, you cut out the thumb hole and then just rip the tissue paper right off!  One finished glove! And here's what it looks like on.  Pretty wrinkly, but it will serve its purpose.

I actually liked making the more complicated gloves, but I'll probably try those out again with better fabric and more time.

So on to the last part.  My sister wanted to be a wizard, so I ended up making her a long hooded cape and a wand.  I don't have any great photos of the cape yet, but she will send me some soon.  I did, however, take photos of the wand.  So many, in fact, that it serves as a sort of tutorial!  So here we go:

It started with a stuffing stick.  I got it in a bag of poly-fil.  You could just use a dowel or a disposable chopstick or something.  If you use a dowel you'll have to sand down one end to make it tapered.

I wanted to add decorative elements, so I whipped out my trusty hot glue gun!  You can do whatever you'd like.  The stick is pretty skinny, so I was limited, but I just added some bands and dots and stuff.

Here's some of the decorations.  Don't worry, it'll look better I promise.

I wanted to make a sort of handle and I had left over leather strips from my purse, so I ended up hot gluing it to the base of the wand.  Lookin' pretty snazzy!  Now pull out your paints! (You should probably wait until after painting to do this step, but I wasn't thinking.)

I just used some acrylic paints I had laying around.  I didn't have brown, so I mixed the primary colors together-red, blue and yellow, and it made a nice brown color for me.  Slap that paint on there!  I showed my sister the wand at this point and she thought I had carved the decorations out.  That means it's coming along!

To make the decorations pop, I painted them with some gold acrylic paint.  I actually wanted to add some gems or something like that on the middle decorated part, but I had none so I just stopped there.  I was pretty pleased with how it came out!

Here's the (folded) cape and wand together!  When she gets those pictures to me, I shall post a better picture of the cape.

Phew! That was a doozy of a post!  Sometime next week I'll post photos of my completed costume as well as my sister's.  I hope this post was helpful to you guys! If you have any questions just leave me a comment and I'll answer it to the best of my ability! :)


Clothes, Tutorials

Dyed Tights with Food Coloring

For Halloween I decided I was going to be Poison Ivy from Batman.  I needed green tights, and of course the one time I need them, there aren't any green tights at all.  Frustrated, I bought a pair of opaque white tights with the intention of dyeing them with food coloring.  I had seen people dye yarn this way, what would be the difference?

Here are my materials:  white tights, food coloring (I used green and yellow), vinegar, a stainless steel pot and a measuring cup.

Pour water in the pot.  It varies for how much you're dyeing.  I used about 4 cups.

From what I read about yarn dyeing, people added about one tablespoon of vinegar to each cup of water.  So I used 4 tablespoons.  The vinegar makes the color really stay in the fabric.

I put the tights in some water to soak for a bit while I mixed and heated the dye bath.

Add your food coloring to the water/vinegar mixture!  I wanted it to be a very greenish yellowish and I was worried the tights wouldn't take the color so well because of the material it was made of, so I used a lot of food coloring.

That looks about right.  Now heat it on medium heat until it simmers

Squeeze the water out of the tights and throw them in the simmering dye bath.

Make sure to get all of the material submerged.  This was kind of hard for me because the fabric kept floating up to the top.  You're supposed to stir it every once in a while as it dyes, but I overestimated just how long it would take to take the color, so I didn't get to stir it at all, which caused an uneven color.  Fortunately that's not a big deal for my costume, but if you want an even color, make sure to stir it every few minutes.  I'm pretty sure I could go back later and re-dye it later anyway.

You know when it's done dyeing when the water is pretty much clear.  You can kind of see in this picture, the water is significantly clearer than before I added the tights.  It's a pretty bluish green color.  I probably could have left it in longer to get more color but I was satisfied with what shade it was so I turned off the heat and let it cool.

Once cooled enough for you to touch, rinse it with water and a tiny bit of dish soap until the water runs clear.

Rinsing!

And here they are!  You can really see how uneven the dye job was in this picture.  Overall I'm super happy with the results, and I'm planning on dyeing more and more tights and things.  Hopefully with time I'll get better at achieving an even color.  Maybe I'll even be brave and attempt an ombre sometime!

I will eventually get an action shot of these tights, but it will probably come after I get the whole costume done.


xoxo-chez

Clothes

Socks socks socks!

     I taught myself how to knit, so I've never been really adventurous with my knitting projects. I pretty much only knew how to knit and purl so all of my projects were scarves, and even then I can probably count on one hand how many of those I've finished. So what got in my head about knitting some socks? I think it was when I was digging through my yarn stash and came across a bag full of alpaca yarn that my boyfriends parents got for me while they were in Peru. To me it looked like it was the perfect weight for socks and I had just found a few sets of double pointed needles. It was obvious, I had to knit some socks. I had to. I only had sets of 4 dpns all in different sizes, but almost every pattern I came across called for a set of 5 dpns. Finally I came across Silver's sock class. Using this pattern successfully made my first sock!

20110506-021123.jpg

Unfortunately it was a tad too big. I used the directions for sock weight yarn. I decided not to waste my time and yarn making a matching sock for that one. Instead I jumped right into another much more advanced sock making technique. I had heard about people knitting two socks at the same time, one inside the other on dpns, and I was determined to try it myself. I took some progress pictures along the way so I could share them with you all!

20110506-022022.jpg

Humble beginnings.


20110506-022103.jpg

Working on the gusset.

20110506-022121.jpg

Here I've flipped the other sock out to show that I really am doing two at once, one inside the other.

20110506-022139.jpg

Toes!

20110506-022156.jpg

20110506-022212.jpg

20110506-022224.jpg

Instead of trying to do the kitchener stitch with both socks on the same needles(I knew I'd probably accidentally sew them together) I moved the stitches around so each sock had it's own pair of needles. I stitched the inside sock, then the outter sock.

20110506-022243.jpg

20110506-022258.jpg

Yay socks!

I've been thinking about dyeing them though. They look a little too ketchup and mustardy to me.

Clothes, Misc-

New Suede Shoe-Slipper-things

I was lurking around on the internet the other day and came across these viking shoes.  As I scrolled through the post, I saw it was a tutorial on how to make them, so of course I had to make some myself.  I went out to my craft store and bought some leather remnants for less than$5 and hoped there would be enough to make a pair of shoes. Before I cut into the leather, I made a pattern out of felt and put it together.  I made some modifications to the original pattern to try to make them into flats instead of sandals and I wanted to make sure it would work.

Here's the pattern all put together

Drawing the pattern out on the leather.  I had JUST enough!

All cut out.

Rounding out the little tab things.

With a marker, I marked out where the holes should go.

Here I am, wishing my boyfriend still had his leather hole punch.

The exacto knife worked alright, here are the holes!

The leather cord was more expensive than the scraps of leather I bought!

Lacing up the back.  If you make these, make sure you pay attention to how you're supposed to thread it, I messed up a LOT on this step.

Lacing up the toe area.

Almost done!

All done and pretty comfy!

Back.

Front.

I think these things are pretty cute and they're quite comfortable.  It's just thin leather though, so these ones are more suitable to just be house slippers.  I'm thinking about ordering some thicker leather and maybe a shoe sole or something to see if I can make something that would be fit for wearing outside.

Clothes

We Are Sex Bob-omb! And We're Here to Retry Making This Shirt and Stuff!

So yesterday I posted my huge failure in trying to bleach my Sex Bob-omb shirt and today I promised to show the spray painted one I ended up making and wearing instead.  Luckily I had another black shirt hiding in my closet, so I whipped up another stencil...

With this stencil I decided I'd try out bridges, because I saw someone use bridges to make sure everything was lined up correctly, and then carefully cut them out with an exacto knife.

Here I am, cutting them out.  If you do this, be VERY careful not to cut your shirt.

All cut out and ready to paint!  I stuck cardboard in this shirt just like last time to protect the back of the shirt.  I'm using some Krylon plastic fusion hammered metal spray paint because that's all I had on hand and I didn't feel like going out to buy a whole can of paint just for this shirt.

If you're spray painting, go outside.  I didn't feel like going into the back yard with the dogs so I hopped out the window onto the roof.

Spray spray spray!

Lookin' pretty done here.  I let it dry outside and closed the window so the fumes couldn't get inside.

After it dried I took it inside and carefully started peeling the freezer paper off.

No bleeding! :D

Woo hoo!  There's some slight over spray up by the collar but it's not nearly as bad as the bleached monstrosity that happened with the last shirt.  Since it's just a tiny bit of over spray I was able to get it all off.

My boyfriend actually taught me this trick, just use tape to pick up the over spray!  It worked like a charm.

Ta da! Here it is in action!

Since I used spray paint, I'm sure the logo will fade somewhat after washing it in the washing machine, but I kind of wanted that effect so I'm totally cool with that.  If you aren't cool with that, then you should look into getting some spray on fabric paints.  I've seen them at every craft store I've gone so so they shouldn't be too hard to find.

So Thursday was awesome, I wore the shirt!  It was at the Alamo Drafthouse in Austin, so they had Scott Pilgrim themed food and Universal Studios paid for each person to have one of the choices of foods and one drink, and Edgar Wright was there with 5 of the cast members!  When I heard he would be there with some of the cast I fully expected like 2 of the cast members to show up.  Michael Cera, Anna Kendrick, Mary Elizabeth Windstead, Brandon Routh and Jason Schwartzman were all there and after the movie they did a Q and A which was pretty awesome.  I ended up meeting Michael Cera and Jason Schwartzman, but everyone else slipped by really fast to get to the after party (that I sadly couldn't go to because I brought my 16 year old sister... the after party was 21 and up).    It was still awesome!!

Clothes

We are Sex Bob-omb!

I'm a pretty big fan of the Scott Pilgrim comics and I was super excited about the movie, nevermind the fact that I love Edgar Wright movies.  So when I got the chance to enter a contest (hosted by Ain't It Cool News) to win two tickets to an advanced screening last Thursday I knew I had to at least try.  All you had to do was enter a picture of yourself rocking out and you could enhance it in Photoshop if you so desired.  So I made my little sister (who was the one who would go with me if we won) put on her Gideon shirt that we made the other day and jump around with her ukulele while I took pictures.  After I picked out the best picture I added in some effects that fit in to the movies style.  And guess what?  We won!! :D  Here's the winning picture:

Immediately after hearing that we won I knew it was time to make my Sex Bob-omb shirt.  I wanted it to be a black shirt with the logo bleached on, so after scouring the internet for tutorials on how to do such a thing, I ended up with a roll of freezer paper, a black shirt and some diluted bleach.

Using freezer paper as a stencil is a pretty cool trick that I've only used once, and never with bleach, so this was a very new experience for me.  Here is everything in preparation of the stencil.  Freezer paper, a printout of the logo (I found it by doing a google image search), an exacto knife, the shirt, and (not pictured) an iron.

Rip off a sheet of freezer paper and put over the printed logo.  The freezer paper is pretty thin so you should be able to see the printed image clearly enough to trace it out.

Next, use your exacto knife to cut the image out.  I didn't cut bridges for the inside details of the face because I figured I could just cut them out, place them in the right spot and just iron them down.

I live in a house full of animals so I have to de-hair anything I want to stencil on.  I'm sure if I skipped this step, the freezer paper wouldn't have stuck very well.

Iron that sucker down!  I put it on the cotton setting (because my shirt was 100% cotton) but I didn't let the iron sit on the stencil for too long.  Just enough to get it to stick down.

Here's the stencil, ready to go!  I ended up using more freezer paper around the edges to protect it from over spray from the bleach.

Find a piece of cardboard that is about the same size as the shirt and carefully put it inside, to protect the back of the shirt from the bleach.

I put my shirt in the bathtub and sprayed it with a mixture of about half water and half bleach.  Everything I read about this process said that the bleaching happens fairly quickly, so don't leave your shirt unattended.  For me, it felt like the color change took ages, but eventually it did start changing.  I was worried that I wasn't using the amount of bleach or something so I kept spraying the shirt, thinking that eventually it'd help.

Here you can see it finally changing to that reddish color that black shirts end up bleaching to.  While this was happening, all I could think was "Hmm, this freezer paper doesn't seem like it'd be that great of a barrier for the bleach, what if it just soaks up all the bleach and bleaches even where the paper is..."

So after it got to the red bleachy color I desired, I rinsed it with cold water and started excitedly peeling the freezer paper off and...

...

...well...

...Shit.  Well it seems like I was a little heavy handed with spraying the bleach... and looking back, I should have found a spray bottle that sprayed a finer mist, and I should have barely spritzed it.    So I thought, maybe I could salvage this mess.... perhaps drawing the black back in with a Sharpie marker?

Okay, that didn't work.  Well damn, what a waste of a black shirt :(

I think I'll have to revisit this freezer paper stencil with bleach again.  But for my Sex Bob-omb shirt I ended up doing what I know... and that's stenciling it on with spray paint.  Tune in tomorrow for that post!

Clothes

Hey man, nice shirt.

I just made this shirt yesterday and I couldn't help but post it up here right away! My older sister is always getting me in to comics and graphic novels, and most recently she got me on Scott Pilgrim.  If you haven't noticed, they've made a movie based on this series - Scott Pilgrim vs. The World.  Because of my excitement for this movie, I decided to make a shirt from Vol. 6, Scott Pilgrim's Finest Hour.  I had been wanting to make it after I finished reading that volume, but the other day I saw some footage of Comic Con where they were screen printing a whole slew of shirts, the one I had been thinking of making being one of them.  So obviously that made me get off my butt and make one for myself!

Scott Pilgrim inspired shirt

Ta da!

I'm in the process of making one for my younger sister.  I also want to make a Sex Bob-omb shirt as well.

Check out my other tutorial on how to make stencils for your own shirts!

Clothes

Ay Sus!

I'm Filipino-American so I know a few silly Tagalog words here and there that my mom says now and then.  My little sister and I like to combine some of these words to make completely nonsensical phrases.  One of these gems is "Ay sus ginoo, sapatos puwet kugmo!"  Any Tagalog speaker now should see that this doesn't really make any sense, but that's the point!  "Ay sus ginoo" is an expression.. kind of like saying "oh my god."  I'm often greeted with that expression from my mom when I'm just goofing around the house.  The rest of it is literally, sapatos= shoes, puwet= butt and kugmo= booger.  So yeah, as you can see, it makes no sense.  Spanish speakers may notice the influence their language has had on Tagalog. Anyway, the point of this post is that my sister and I wanted to make shirts with this phrase on them.  We would always talk about it, but never really do anything, so randomly I decided I was going to make mine at least... I didn't know what shirt she wanted to use, and I didn't know if she approved on the final layout of the letters.

imgp4646

Here's the printout.

imgp4648

Here it is after I got to exacto-knifing.

imgp4650

I spray-adhesived that sucker down.

imgp4651

Then I sprayed black spray paint everywhere.  Notice that I had to do some more masking off with tape to avoid overspray.

imgp4653

The finished product.  There's a little overspray on the neck, but I can live with it.  I loved how it turned out anyway.

So that concludes my experiment with stencils and spray adhesive.  I've done stencils before, but I'd always just kind of hoped they'd stay in place... I finally got my hands on some spray adhesive and used it!  Since making the shirt, I've kind of abused it.  I just threw it into the wash and dryer without setting the ink or anything, and it bled and smudged a little, but whatever, I'll still wear it.

Clothes

The poor mans dress form

Soooo, not everyone has enough money to buy a dress form.. especially nowadays.  Luckily for those of us who would like one, it's not too hard to whip up a cheap one if you have the right stuff.  There are a zillion tutorials on how to make one for cheap.. whether it be with paper-tape, paper mache or duct tape.

My little sister wanted me to make a dress form of her, and I chose to use duct tape because the last time I had worked with paper-tape was pretty frustrating, and I didn't want to have to deal with it.  Plus we already had some duct tape anyway.  So, here are the photos that follow our dress form making journey.

The shirt wasn't long enough, so we used scrap fabric and just taped it onto the shirt so we could extend the dress form further down.  Also, on her neck we used toilet paper.

Overall we were pretty happy with the results.  Neither of us have yet to use it that much though.  Honestly, I'm considering doing a paper mache dress form just so I don't have to deal with sticky pins from the residue from the tape.

Clothes

Wind me up!

Phew, it's been a while!  If you guys hadn't noticed, this blogging thing is pretty difficult for me to stay on top of.  Hopefully soon I'll be able to post somewhat regularly, haha. :) I've done a few things between now and my last post.. one of the biggest things being attending the Austin Maker Faire.. and I know I'm going to be a few weeks late, but I'll eventually post a few of my pictures from there.  I also made a duct tape dressform for my little sister and I've started a jacket.. which has been sitting in my room half finished for about a week.  Oh yeah, I just made these awesome earrings, but you'll just have to wait for those pictures because this post is really for my... halloween costume!

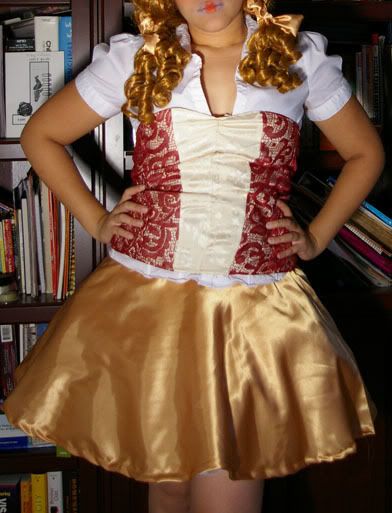
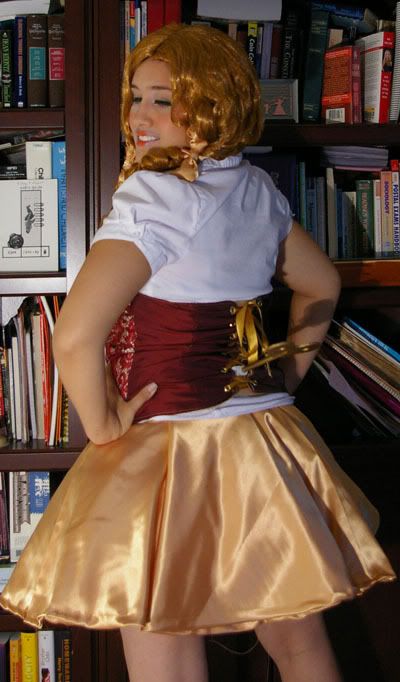
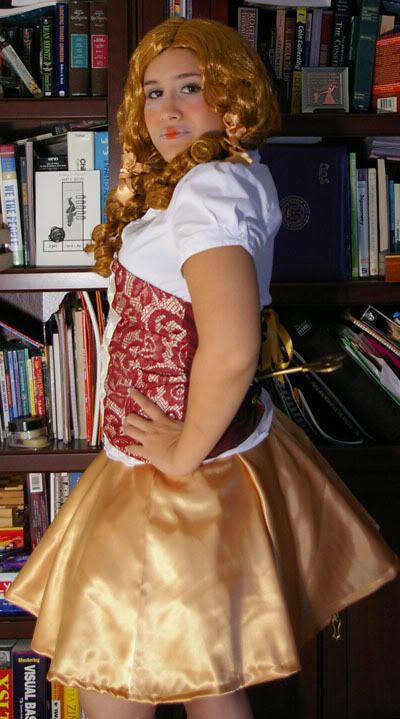
I decided to be a wind up doll and I really wanted to put moving parts on it.. of course that would be the little key part on the back.  All in all, I made a corset-ish type top, a simple circle skirt and an awesome petticoat that I love.. and will definately use again.. but I don't have any pictures of it because it's pretty see through.  Last year I made a last minute petticoat with tulle and I just took a piece and gathered it so it was kind of like a tutu, but I really hated it.. it was uncomfortable and I didn't like the way it looked, so this year I decided to put more time and money into one so hopefully I could reuse it time and time again.  I used this tutorial by sugardale but I shortened the length to fit the skirt.  It was somewhat time consuming, took up a lot of thread, but overall I'm super happy with the result and I know I'll be saving it to use again and again!

For the skirt I also used a tutorial, but I cannot find the exact one I used right now, but there are pages and pages of circle skirt patterns when I searched google, so if you need one that's a good resource.

I'm not too happy with how the top came out.. I really wanted it to be a corset, but I just wasn't confident enough with myself and I just ended up sewing panels together and lacing up the back.. so it was somewhat like a corset.  I refused to buy a pattern and tried to make one myself, which I regret doing, but it was too late to go out and buy one by the time I was making the top, so I guess I just lived and learned :)

So, I've been building up the anticipation to see this costume I've been rambling on about, so I present now, the pictures!

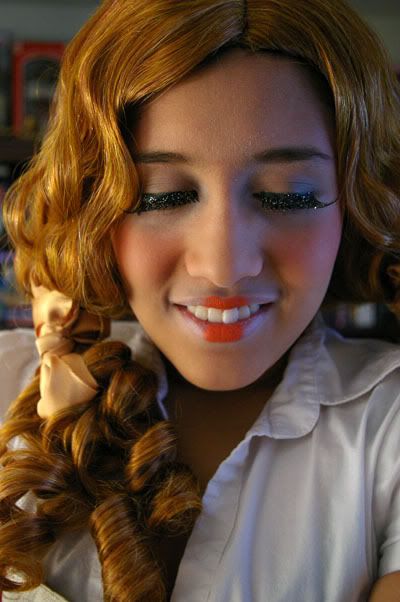
The makeup:

And finally, the part I'm most proud of with this costume... the wind-able key! httpv://www.youtube.com/watch?v=7alUNLzpOyo Testing it out.

httpv://www.youtube.com/watch?v=DdozzPiu9iU Actually on the costume.

So there's that.  I hope you guys enjoyed it, unfortunately I'm the only one who enjoyed this costume haha, for the party I was going to attend didn't happen, so I spent all night on Halloween playing Little Big Planet. :)

Clothes, Tutorials

Oh my god, shoes.

I'm not even going to try to come up with excuses as to why I haven't posted in forever... I'll just get to the good stuff. My little sister had some shoes she didn't really care for anymore, and asked if I could re-cover them for her.  I had seen an article in Craft Magazine where they had done this so I knew it could be done.

Here are the shoes in question:

So following the instructions in that magazine, I whip out my exacto knife and start cutting.

Basically you cut all of the fabric off.. All of it!  Also, not pictured is me ripping out the inside of the shoe.  The bottom cushioned part.. thing.  Be careful when you do this though, because you'll need them later.

The remains of the shoes.  As you can see, I kind of rushed ripping out the bottom parts.

Next, I took the fabric she chose and used the old shoe fabric to make a pattern.  You might not want to use markers here to draw it out... I just usually end up grabbing the closest thing to me when I'm doing this sort of thing.

I also drew out and cut the pattern out with the inside fabric, shown here.  These are the tongues of the shoes. (I also cut them with the houndstooth fabric as well)

Sew those puppies up.  I used the old fabric from the shoe as a guide for the decorative sewing.

Sorry, bad picture.. Me grommeting the holes for the laces.

A crappy, blurry picture of the new pieces with the old pieces.  As you can see, I added a little more on the bottom of the tongue because I wanted to make sure I had enough.  I ended up cutting off some when I put it in, but I figured that was better then not having enough!

More unpictured steps are where I glued in the fabric.  I glued in at least 1/4 inch of the fabric all around the bottom edge of the shoes, glued the tongue in and finally the bottom cushioned part back in place.  If done right, the fabric for the main part of the shoe should be sandwiched between the sole of the shoe and the cushioned part that was glued in last.

I waited for the glue to cure and whatnot before I laced them up because I didn't want to accidentally rip out the fabric.

What I did though, was put the shoes on (unlaced) to put some weight on the shoes so it would be stuck real good!

Ta da!  All laced up and ready to go!

I'm hoping to take some better pictures of the shoes soon.  When I do I'll make sure to post them up!

Clothes

It's time to dye some shoes.

A week or two ago, my little sister asked me if I could dye her shoes black because she didn't like the blue and red plaid.  I finally decided to do it and share the process with you guys.  This is my first time dying shoes, so I might have done some things strangely, so if there's any way I can improve, please let me know!

What I used:  shoes, dye, a container, gloves, cotton balls(not pictured)

You need rubber gloves unless you want colored hands for a while.. I got a dye concentrate, so I just poured a little into the container and got going.

Here I am, about to start the dying process.

Oh yeah, here we go.

Pretty much done!  And this is why you need gloves :)

Ta da!  A pair of black shoes.

Thanks go to my older sister who dyed the left shoe as I dyed the right.  :)

Again, I'd like to apologize for my absence lately.. End of school and whatnot has calmed down, so I should be able to start posting regularly again. :)

Clothes

A skirt!

I'm so sorry for my disappearance everyone!   I had to run away to work on school work and whatnot.. finals week called for many projects, papers, etc.  but now I'm all done!  Yay!  My older sister is done with college too.. cept not like me.. I still have a year to go.  No, she's done completely!  We're heading to her school to watch her graduation today, and I had a skirt I was going to wear but when I was looking at it last night and decided that it looked too much like a work skirt.. so I decided to make something to wear.  I combed through my fabric stash and picked these:

I've had these for so long!

So I got to sewing and cutting.  I had just vacuumed my floor and now I have to do it again because of all the seeds I had to cut off of this fabric so it wouldn't break the needle in my machine..

Here's the finished product!

Don't pay attention to the green shirt, it's just what I was wearing at the time haha.

Kinda blurry, sorry :(

Again, apologies for the lack of posting.. I have a lot of things lined up, I just never had time.  I do now though! :D