I love to bake and cook, but I've never tried to make bread before.. that is, until a few days ago. Unfortunately my first loaf turned out wierd and half unbaked, but I've since then redeemed myself. The kind of bread I chose for my first ever to bake is challah. When it came to the egg wash and the topping I changed the recipe slightly. I'll elaborate on that when I get there though.. for now, I'll talk you through the journey!
Ingredients:
2 teaspoons yeast
1/4 warm water
3 1/2 cups flour sifted
4 eggs (only three go in to the dough, the last is for the egg wash)
1/4 honey
1/4 oil
1 1/2 teaspoons salt
Mix the yeast with 1/4 cup of the flour and the warm water and let it sit for at least 20 minutes. While you're waiting, mix together the three eggs, honey, oil and salt. When the yeast mixture is all good and bubbly mix your honey mixture into that. Then dump in the rest of the flour (3 1/4 cups should be left) and mix it all up by hand. When it starts to come together, dump it out onto a floured surface and knead it. The recipe I used said to need for 5 minutes maximum. I averaged about 3 minutes. After you're done kneading take your little dough ball and put it in a bowl, cover it with a damp cloth and put it somewhere warm. When I do this, I usually set the oven at a low temp. while I'm making the dough, and then when I put it in I turn it off. Anyway, after that is the fun part! The braiding. I searched around youtube for a good instructional video on how to braid challah, and I chose to do the 6 strand braid. Here's how it looked after braiding:
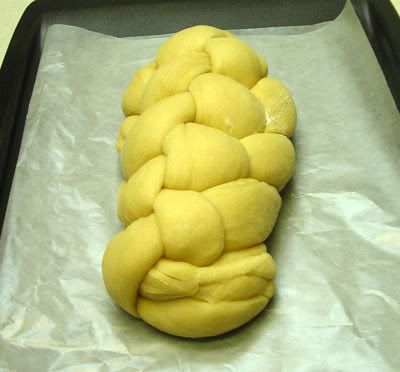
Pretty nice... except for that little area at the bottom, but whatever. I figured I'd eat that end first. So after you braid it all up, you get to have more fun waiting. Another two hours. Oh yes. Cover it with a towel or plastic wrap and stick it back in that warm spot. After two hours it should have doubled in size... but for me on my first attempt this did not happen. It didn't even double in size after the first two hour wait. Stupid yeast ended up being too old. Oh well. I'll show what it looked like when it didn't work and when it did, so you guys can kind of tell if you decide to try to make this. Here's the stupid after the second two hour wait.. and how barely grew:

Stupid thing...
Anyway, I still tried to bake this thing. Set your oven to 325 and get out that egg to prepare the egg wash. Crack it in a bowl and mix it up and you've got your egg wash. Brush it on carefully.. you don't want to push out any precious air. Some places I've read that you're not supposed to put that much, but some places say to use a lot, so I'd just say go with what looks good to you! That's what I do. After the egg wash you top it. Traditionally it's topped with sesame seeds, and sometimes raisins... but I wanted mine to be sweeter, so I topped it with cinnamon sugar... yeah, I cheated.. but it's delicious.
Now throw it into the oven!! Bake at 325 degrees for 35 to 40 minutes. The recipe I used said to stick a pie pan full of ice cubes in there with the bread to keep the conditions humid inside the oven, but to take it out for the last 5 minutes of baking, to let the crust really get brown and harden. Here's what I pulled out of the oven after 35 minutes...
Eww. It looks wierd. It ended up being so dense because it didn't rise.. that the inside was still dough. It was pretty gross. I still ate the butt ends though. Yum.
On to the second try!
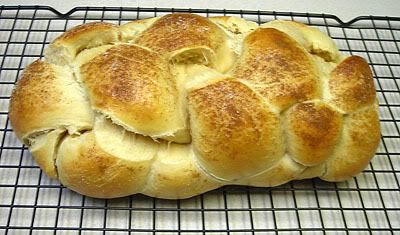
I got newer yeast and tried again the next day. I meant to take a picture right after I braided it and before I let it rise for a good comparison shot, but unfortunately I forgot... I have a good shot of it after rising though!

This is with the egg wash and the cinnamon sugar. My mom said it reminded her of chicken. My braiding is pretty shotty for this loaf... this is a picture of the pretty side.. the other side is wierd and uneven. I was preoccupied with the season finale of Lost. You can compare the last loaf with this one... I used the exact same sheet pan to cook the bread, and you can see just how much bigger this one got.
But of course, something had to go wrong(actually, it's not too bad, it just makes it not as pretty as I hoped it'd turn out).. the oven decided to bake unevenly so the pretty side of the challah is a lot lighter than the ugly side. The ugly side got as dark as challah's supposed to, so I didn't want to keep it in longer. Well, that and because I'm impatient and I wanted to eat some. Here it is:

There we go.. Looks MUCH better!
Here is a picture of its insides:
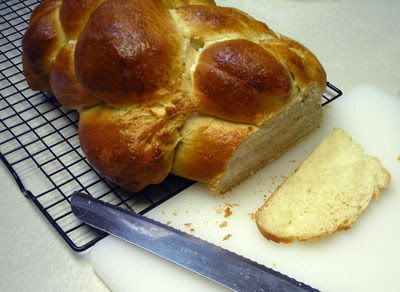
Mm, so yummy.
I've heard that this bread is great for making french toast with because it's already sort of sweet because of the honey. I'm totally going to make some sometime. It's also good just by itself. Mmmmm.